background-image: url("images/titleSlide.jpg") background-size: contain --- class:segue Getting Started --- #  Derailment (Ray's Academic Blog) Derailment has posts on how to set up a Mac: + [Configure a Mac](https://derailment.netlify.app/2019-10-29-configure-a-mac-for-data-science/) + [Installing R on Mac](https://derailment.netlify.app/2019-11-16-installing-r-rstudio-on-a-mac/) There are also posts on how to set up a Windows machine: + [Configure on Windows](https://derailment.netlify.app/2019-11-01-configure-a-windows-pc-for-data-science/) + [Installing R on Windows](https://derailment.netlify.app/2019-12-10-installing-r-rstudio-on-windows/) There are posts on configuring and updating: + [Configure R/RStudio](https://derailment.netlify.app/2019-12-22-configuring-rstudio/) + [Setup Git/GitHub/GitKraken](https://derailment.netlify.app/2020-04-10-configure-github-with-gitkraken/) + [Update R/RStudio](https://derailment.netlify.app/2021-07-19-updating-r-and-rstudio/) --- class:segue Why Bother? --- background-image: url("images/articles.png") background-size: contain --- # The NIH Cares .center[ https://www.nih.gov/research-training/rigor-reproducibility <br><br>  ] --- # The Gold Standard + Data scientists can archive a compendium of work, which includes the .red[raw data], all the data .red[processing/analyses code], all the analysis .red[software itself] and the resulting .red[manuscript] in a bundle. <br> This perfectly reproducible workflow requires .red[extra R packages] like `renv` and .red[extra software] like `docker`. .center[   ] <br> + This also requires .red[extraordinary care] to deal with Protected Health Information. --- # Good Work + Non-experts can easily build a project which will knit together all of the .red[data processing] and the .red[text], .red[tables] and .red[figures] for a paper into a single document and share that information with the world. <br> <br> This workflow, which .red[excludes] the .red[raw data] and the analysis .red[software] itself, goes a long way toward allowing reproduction of findings. --- # Where We are Going .pull-left[ + Use modern R and RStudio to quickly and easily set up a .red[paper outline/shell] for a biomedical research article. + Easily organize a research project and .red[embed analysis, figures, and tables] directly into your article. + .red[Stop copying and pasting] analysis/tables out of Excel into Word. + You get the shell for a paper in just a .red[couple clicks]. ] .pull-right[  ] --- # Just how quick and easy? Just add rUM... .pull-left[ 1. .red[Click] to install a package. 1. .red[Type rUM]. (capitalization matters) 1. .red[Restart] RStudio. 1. .red[Click] New Project... from the File menu. 1. .red[Click] New Directory. 1. .red[Click] Research Project Template. 1. .red[Choose where] to save the project. 1. .red[Click] Knit. ] .pull-right[ .center[  ] ] --- class:segue Demo --- # What does ~~that hard work~~  get you? The rUM project template creates a folder that contains: 1. The paper shell, called .red[_reproducible.Rmd_] (you can rename it) 1. An empty folder, called .red[_data_], to hold your data 1. An RStudio project file, with the name you chose 1. Bibliography files, named .red[_references.bib_], to hold references to articles and an automatic bibliography file, named .red[_packages.bib_] with references to all the used R packages 1. A bibliography style file, named .red[_the-new-england-journal-of-medicine.csl_] to format your references 1. A file, named .red[_.gitignore_] to help protect you from accidentally sharing data --- background-image: url("images/installed.png") background-size: contain --- class:segue Authoring --- # How Do I Write/Edit in RStudio? The document is in a format called `R Markdown`. It saves with a suffix of `.Rmd`. You can use point-and-click tools to edit it. Click the Visual Markdown Editor button: .center[  ] .center[  ] --- # Editing Tools - Formatting Text It works like a word processor. Highlight and click a button. <br><br> .center[  ] --- # Editing Tools - Spelling Right click to fix spelling or add to the dictionary: .center[  ] --- # Navigation You can jump to sections using the document outline .center[  ] -- or the navigation control .center[  ] --- # Cross Referencing `\(_{(1)}\)` You can add IDs to sections of your paper (as well as figures/tables) and then put in hyperlinks. To add a section identifier: <br><br> .center[  ] -- <br><br> .pull-left[  ] -- .pull-right[  ] --- # Cross Referencing `\(_{(2)}\)` If your paper is using section numbering, you can use the menu to add links to sections: .center[  ] -- .pull-left[ .center[  ] ] -- .pull-right[ .center[  ] ] --- # Cross Referencing `\(_{(3)}\)` If your paper is not using section numbering, you need to type some `markdown` code. The syntax to cross reference a section is: ```r [`label`](`#link`) ``` where the <mark>label</mark> is the text for the reader and <mark>#link</mark> is the section ID. -- <br> .center[  ] -- .pull-left[ .center[  ] ] -- .pull-right[ .center[  ] ] --- # Doing Calculations in Text You can nest a calculation directly into the narrative by clicking the code button. .center[  ] -- Then type the letter <mark>lowercase</mark> r and then your formula. .center[  ] --- # Preprocessing Code Blocks If you need to do something complicated, like .red[calculating how many subjects] were enrolled, you can add a code block. You can do some calculating, then reference the results. <br> <br> .center[ 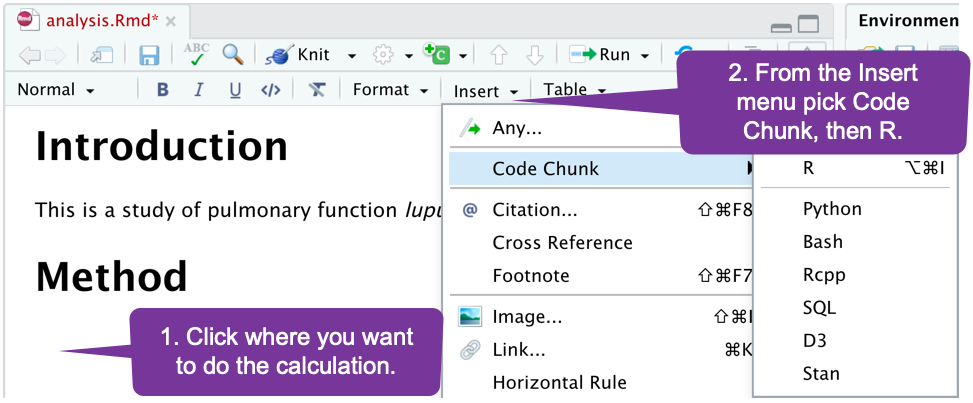 ] --- # Using a Code Block Write your R code below the line with {r}. You can later reference any object you have created. .center[ 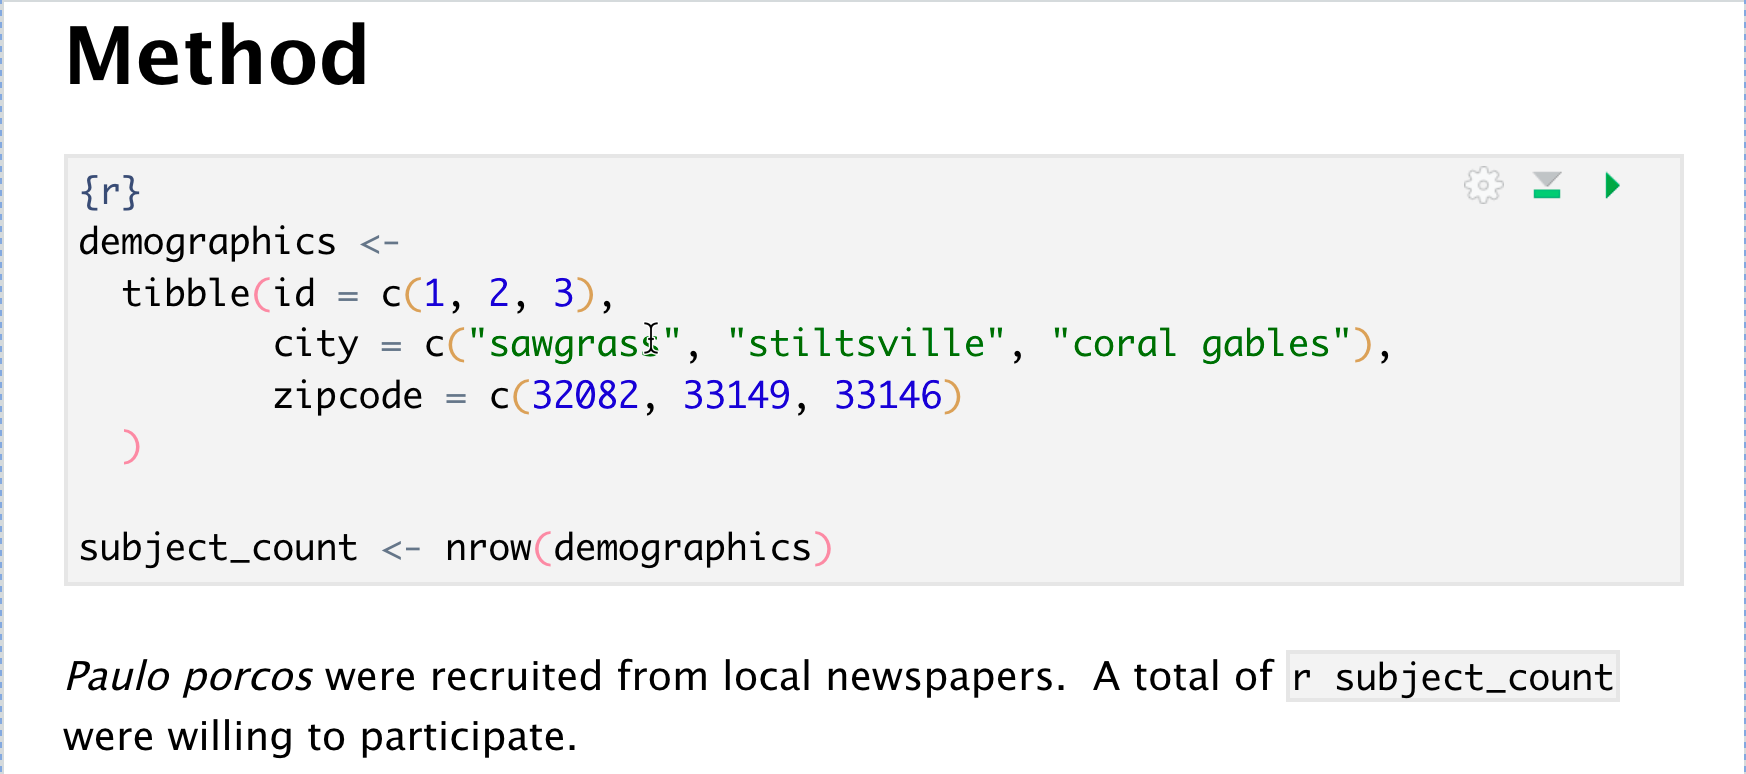 ] -- And you can use functions in inline code. .center[ 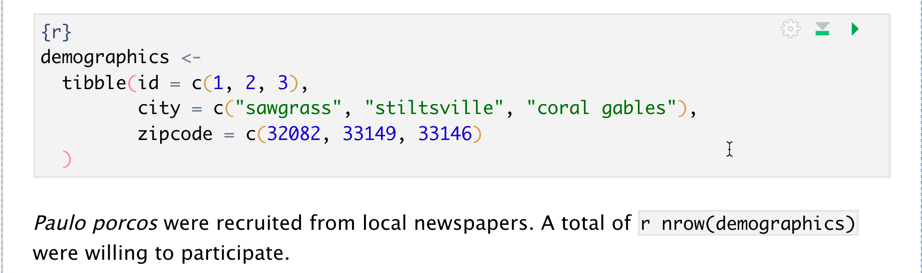 ] --- # Adding References `\(_{(1)}\)` Adding references/citations is simple: <br><br> .center[ 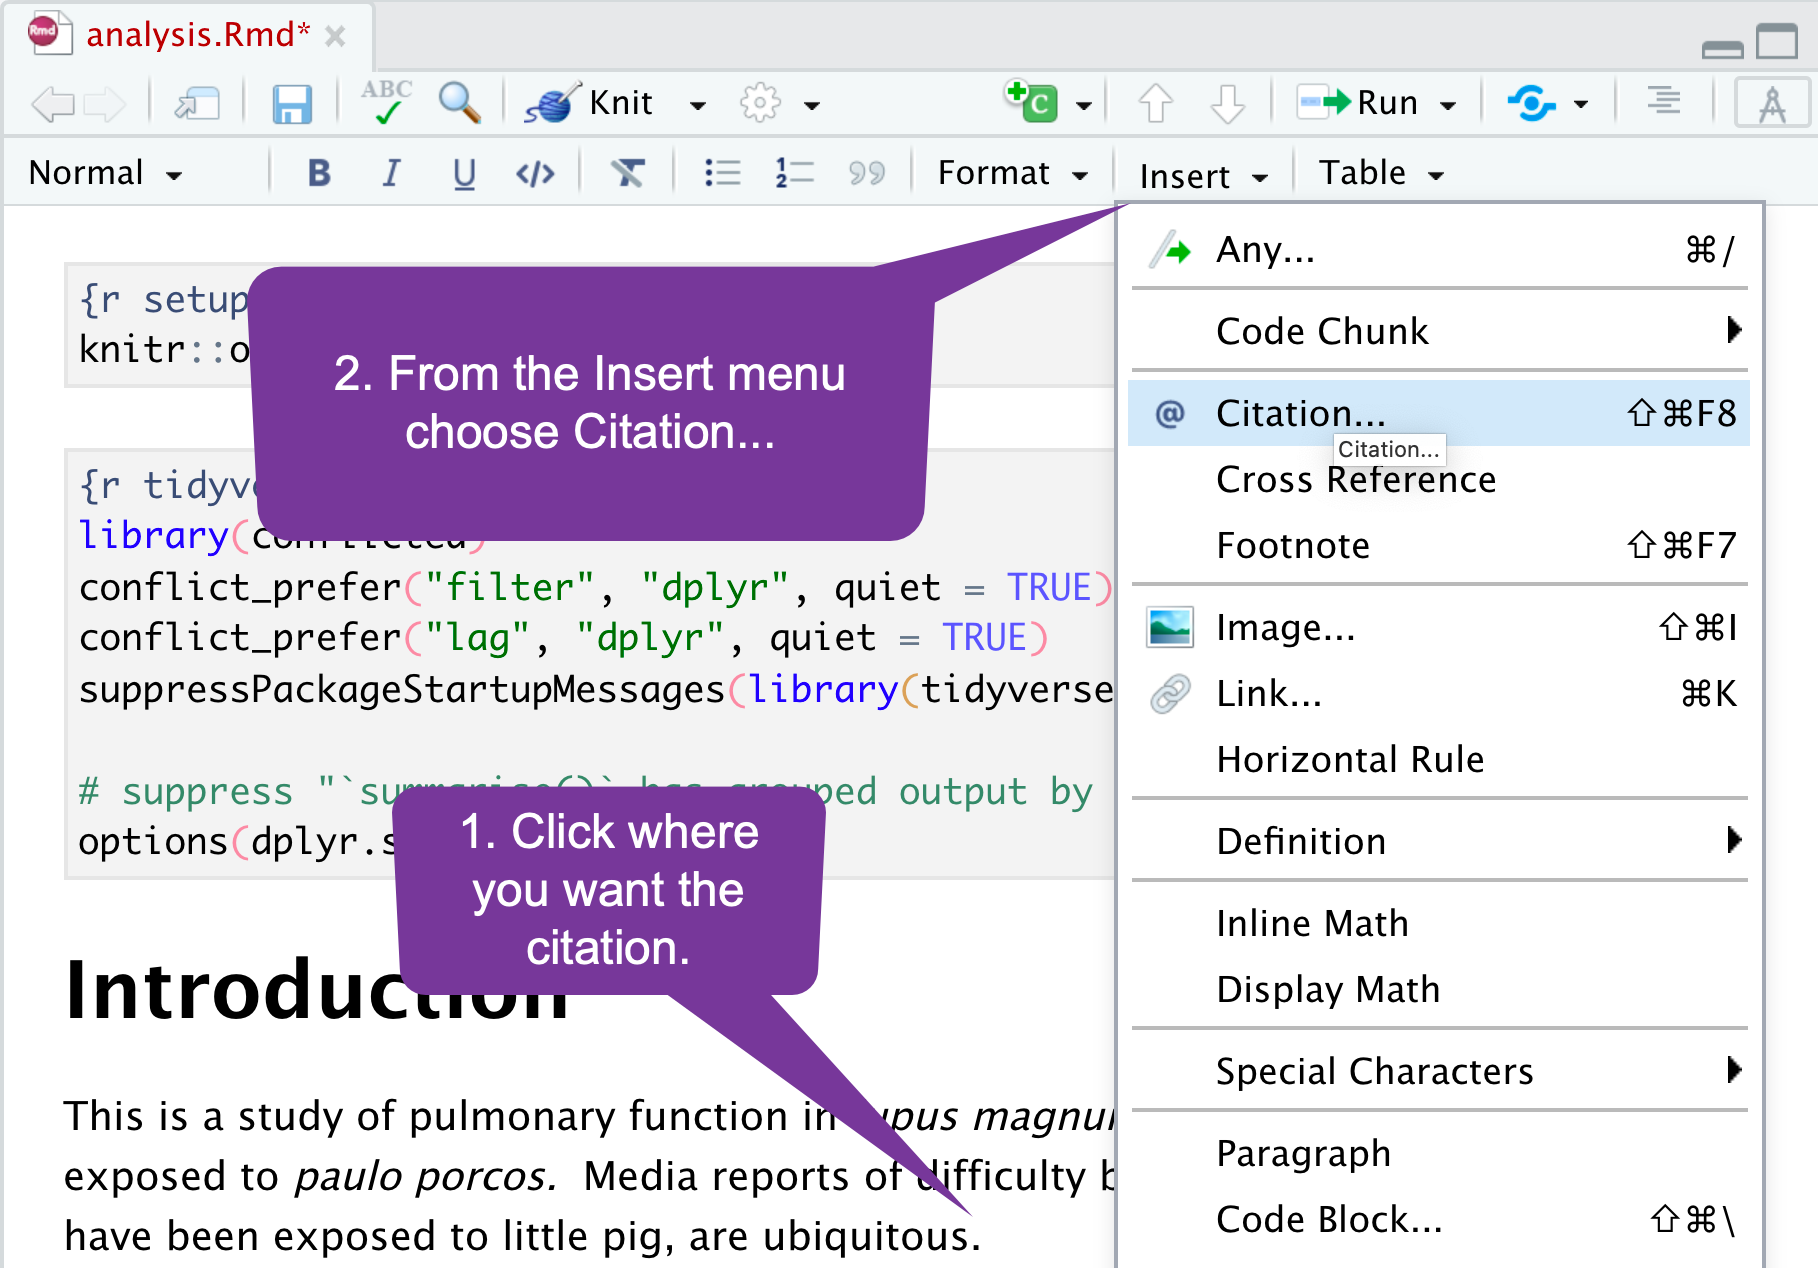 ] --- # Adding References `\(_{(2)}\)` There are many search engines to help you find your article: <br> .center[ 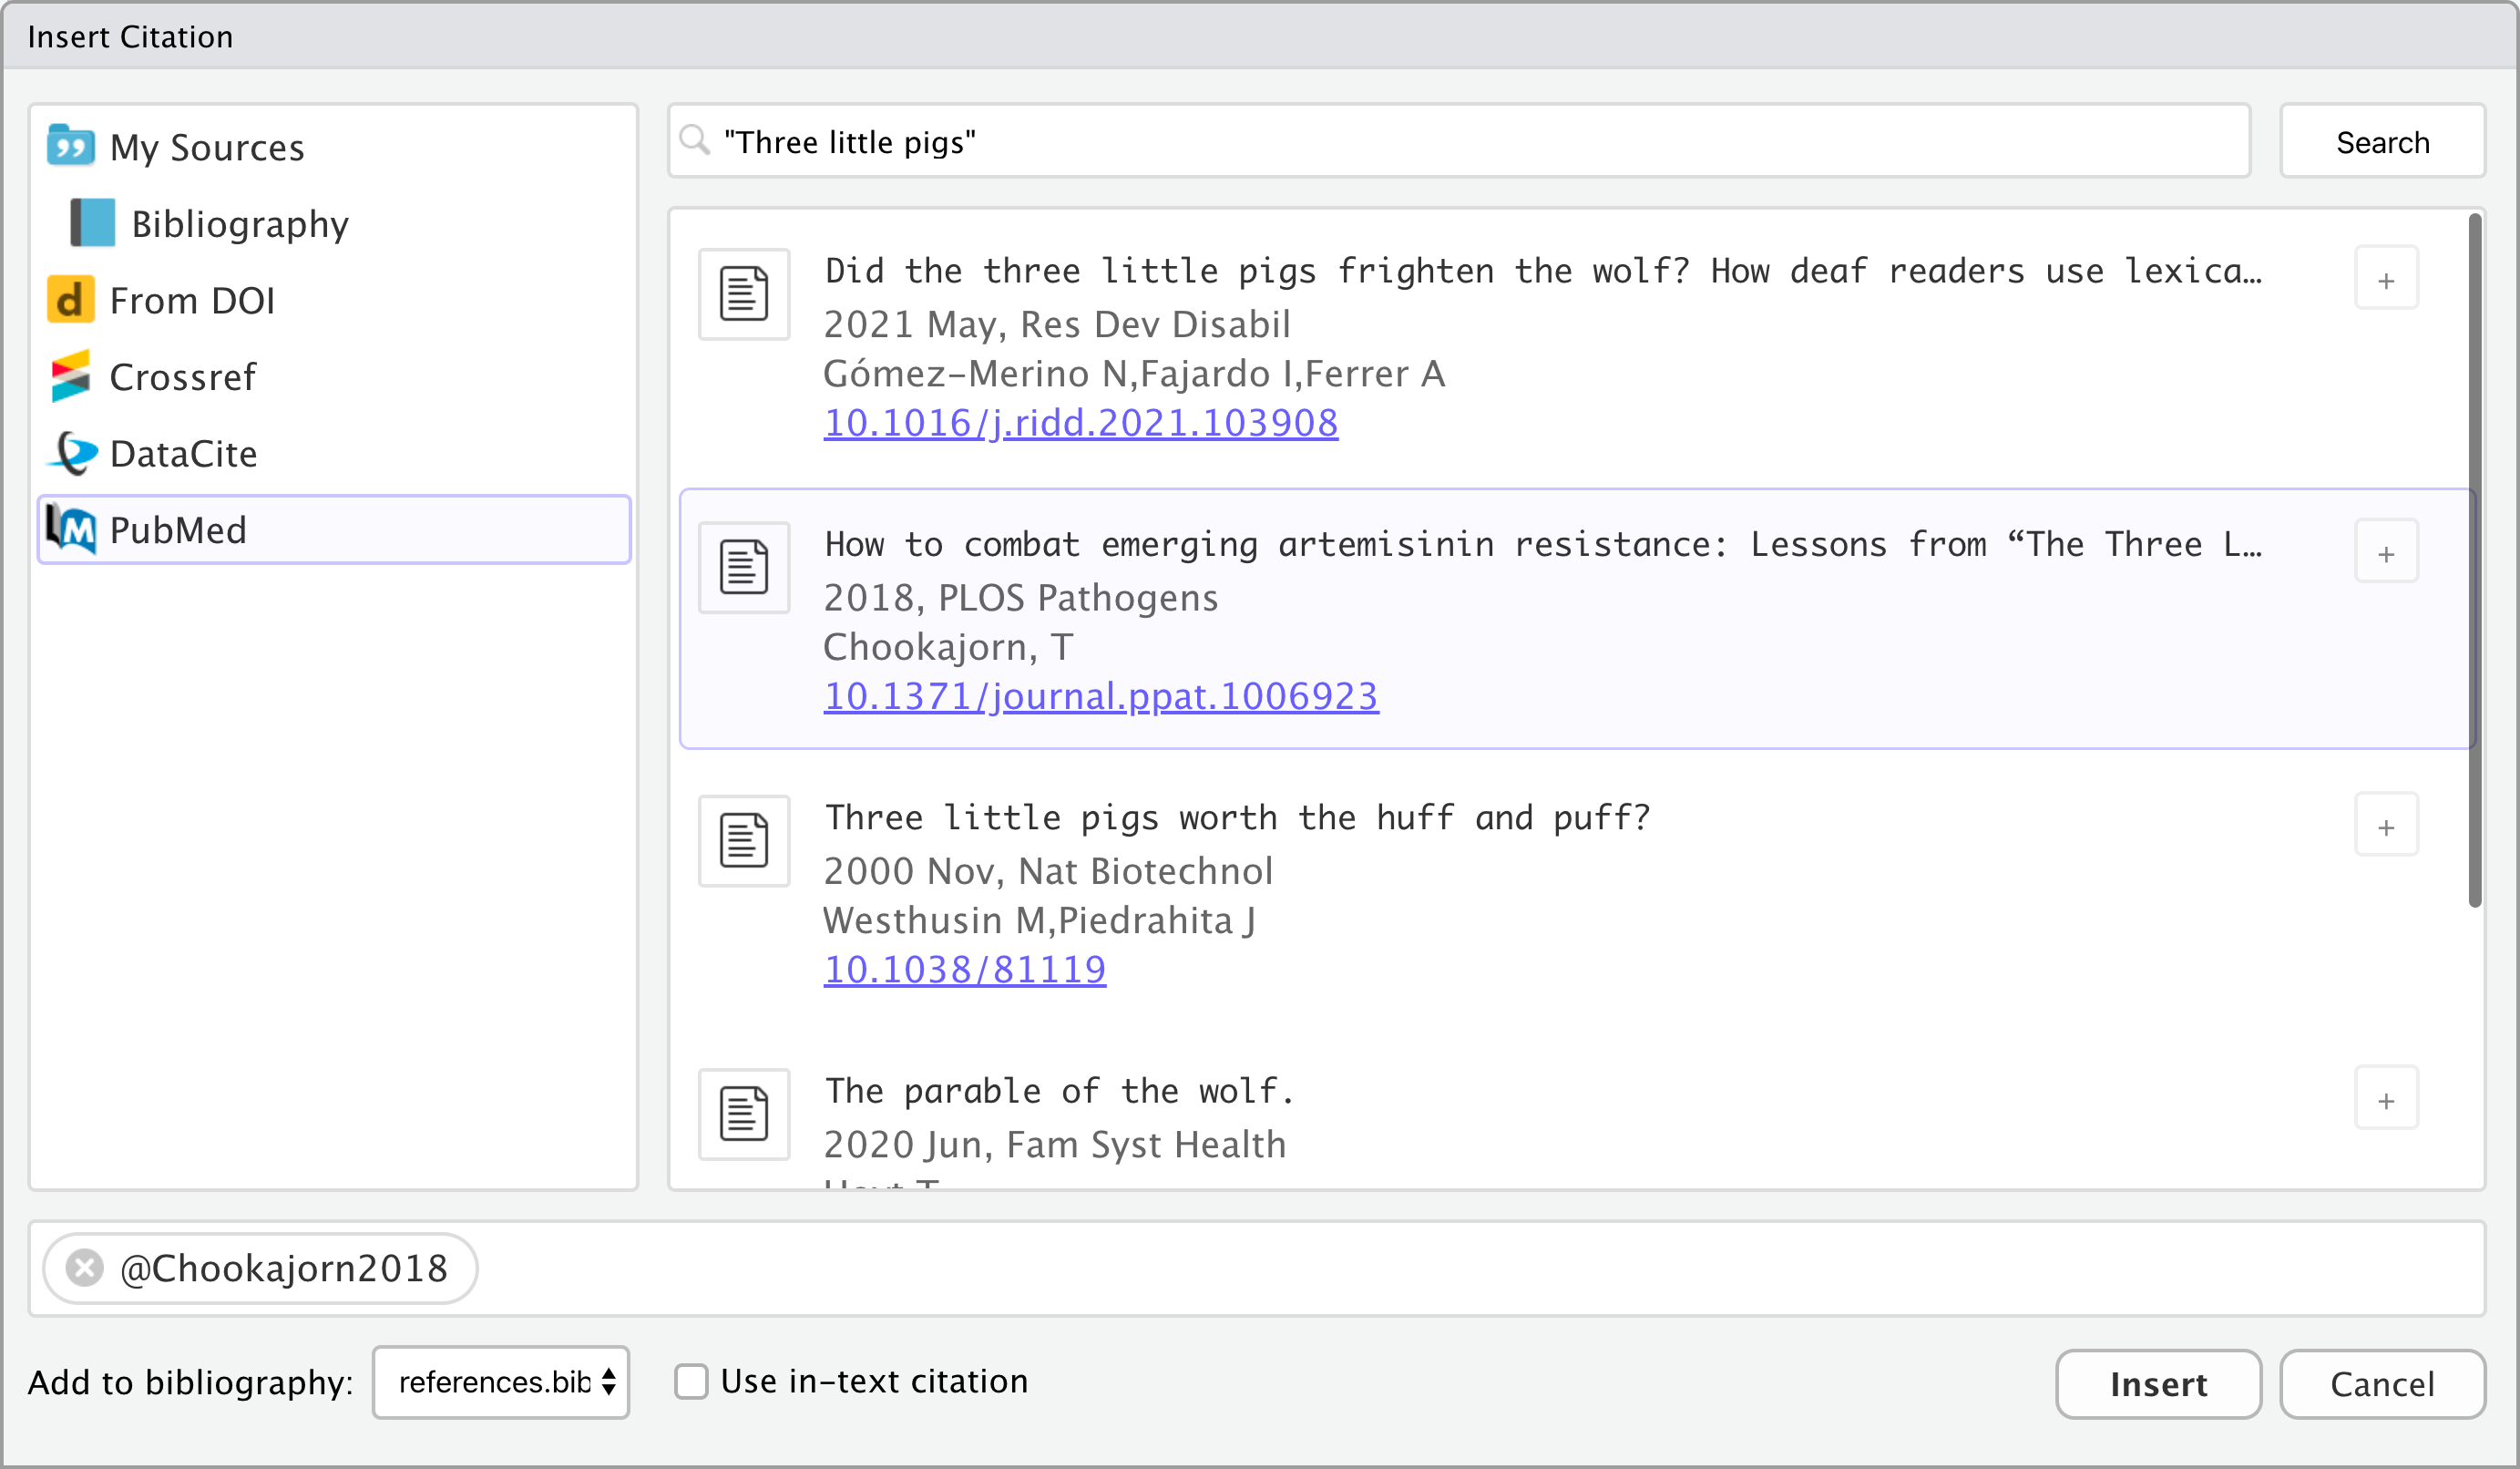 ] If you use Zotero your complete reference library will be listed. --- # Adding References - NEJM Style .pull-left[ New England Journal citations go at the end of a sentence. <br><br> .center[  ] ] .pull-right[ The output appears as: <br><br><br> .center[  ] ] --- # To Use a Different Bibliography Style Search the [Zotero Style Repository](https://www.zotero.org/styles) website and save the ".csl" file into your project folder. Then change the YAML header in the ".Rmd" file to match the file you downloaded: ```r --- title: "your_title_goes_here" author: "your_name_goes_here" date: "r Sys.Date()" output: bookdown::html_document2: number_sections: false bibliography: [references.bib, packages.bib] csl: `the-new-england-journal-of-medicine.csl` --- ``` --- # Using American Psychological Association (APA) Style If you download the apa.cls file into the project folder and tweak the YAML header, your references will appear in APA format. .pull-left[ End of Sentence References - use `[ ]` .center[  <br><br>  <br><br>  ] ] .pull-right[ Inline References - without `[ ]` .center[  <br><br>  <br><br>  ] ] --- class:segue Using GitHub --- # Why Bother? 1. To get a job... + Anybody who claims to do data science or who wants a job in industry needs to know how to use git/GitHub. + If somebody does not have GitHub on the top of their resume I stop reading. + I look at GitHub usage to judge if I want to hire somebody. 1. Most people in the R world post code on GitHub. You can see how other people solve problems. 1. If you do something useful you can share. + It is nearly no effort to share your algorithms with the world. 1. You can also do pretty hardcore project management with GitHub. --- # Using `git` and `GitHub` + `GitHub` is a website that lets you share any file with the world. + `git` is software that helps you keep files synchronized and helps resolve conflicts if more than one person has edited the same part of a file. + Derailment has a post to help you set up `git` and `GitHub`. <br><br><br><br> + Obviously you need to be careful that you <mark>do not put sensitive data</mark> like Protected Health Information (PHI) and Personally Identifiable Information (PII) onto GitHub. + If you build a project using `rUM`, it automatically puts a file into the project folder, called `.gitignore`, which helps block the sharing of files that it recognizes as data. --- # How to Make a Project on GitHub .pull-left[ 1. Log into your account. 2. Create a new project. .center[ 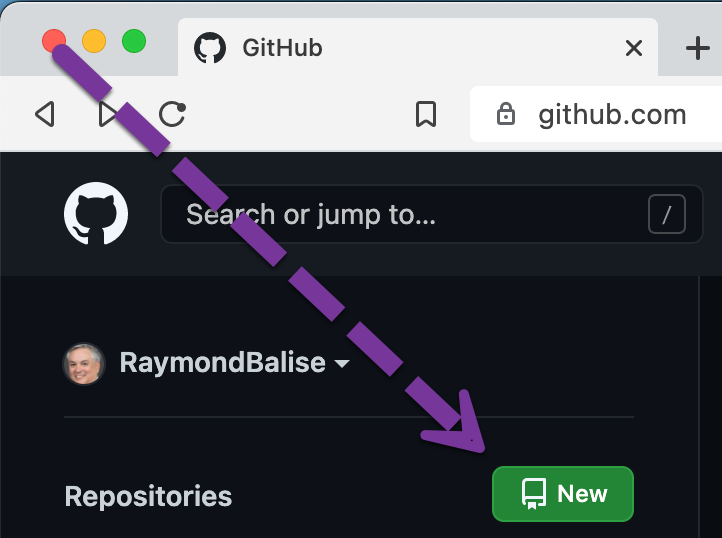 ] ] 3. Make a "Repository". .pull-right[ 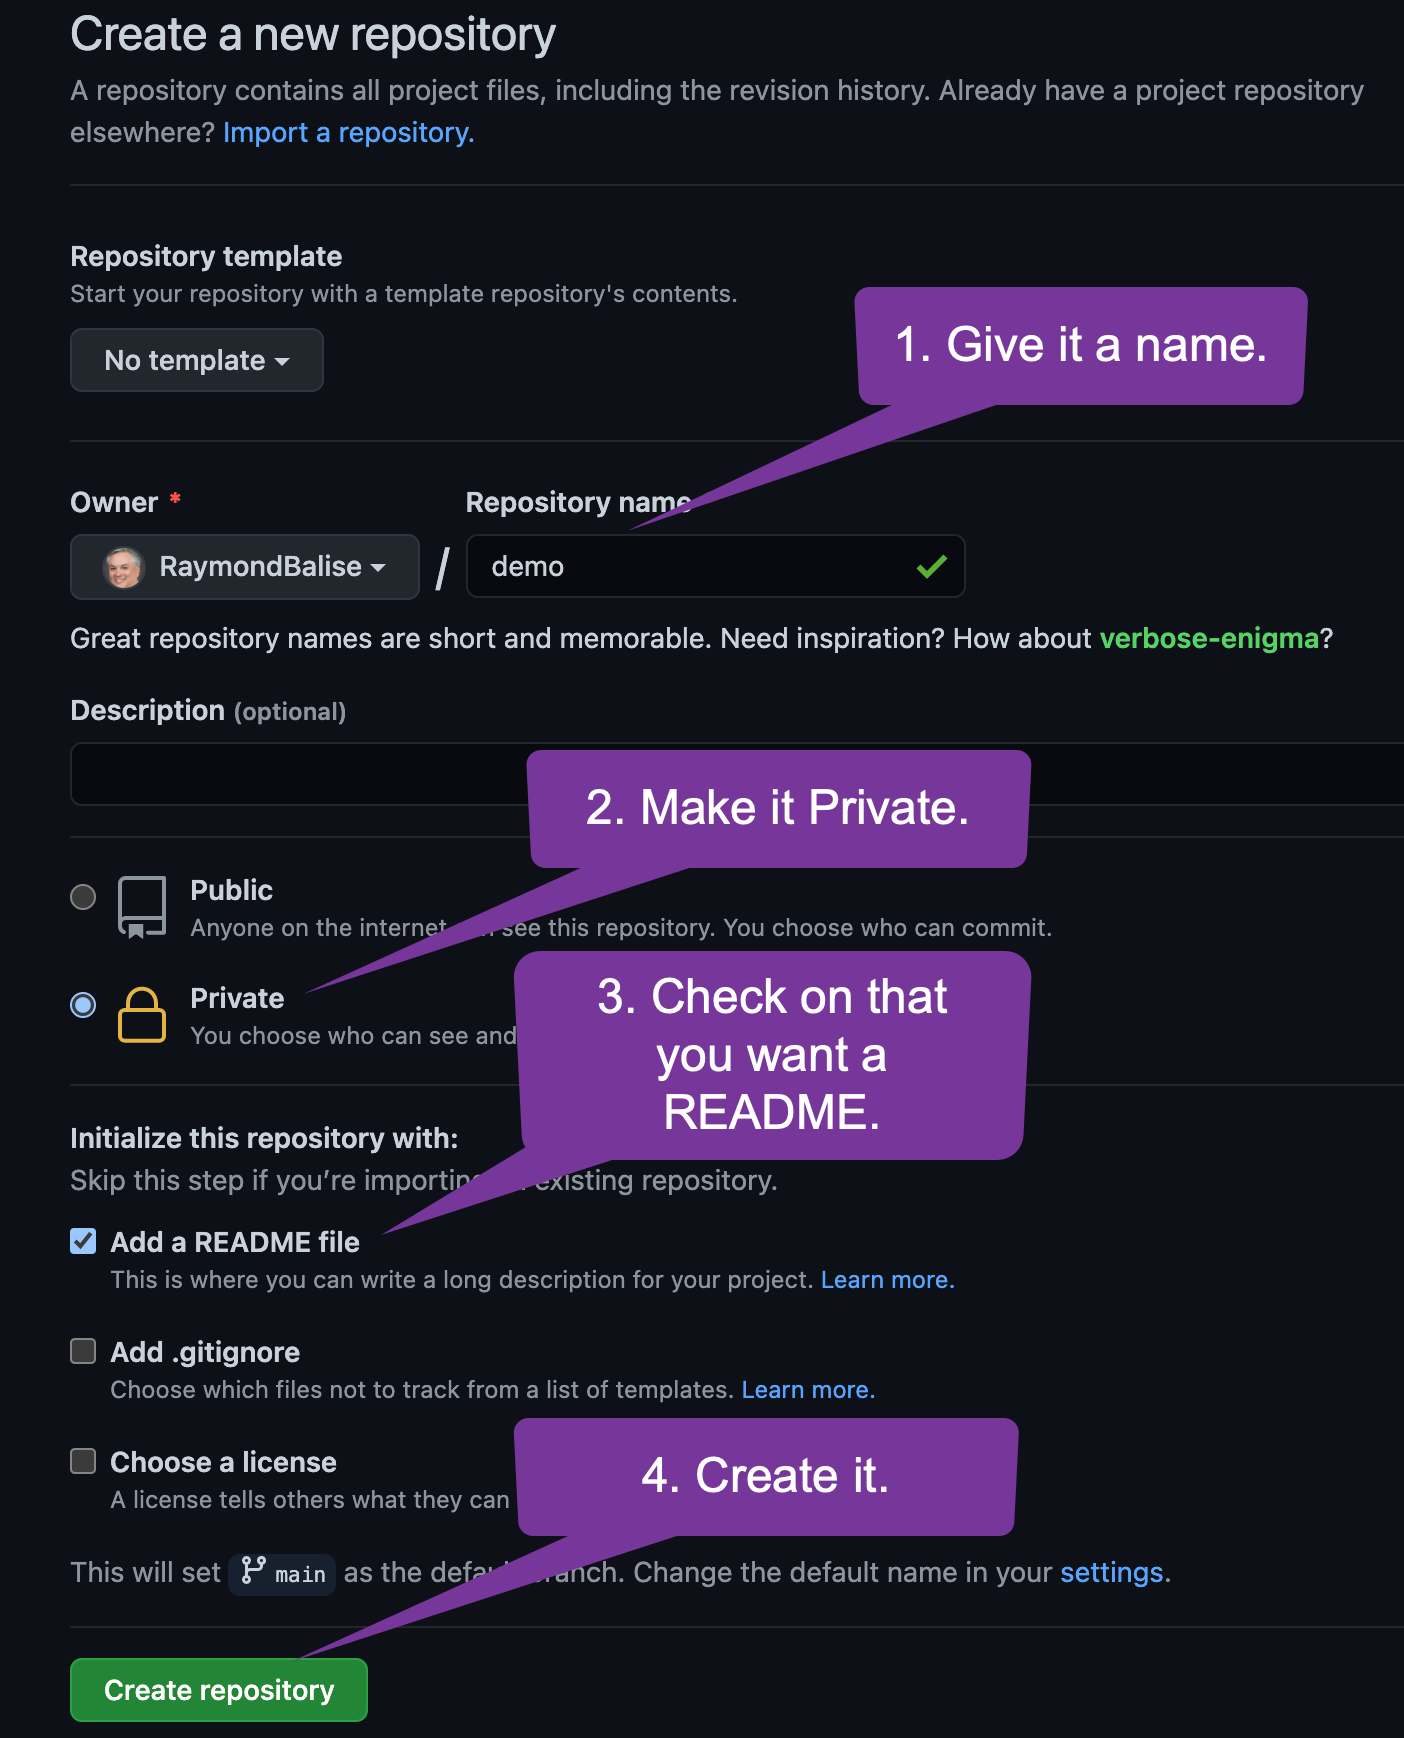 ] --- # Get the URL so you can sync your local machine. .center[ 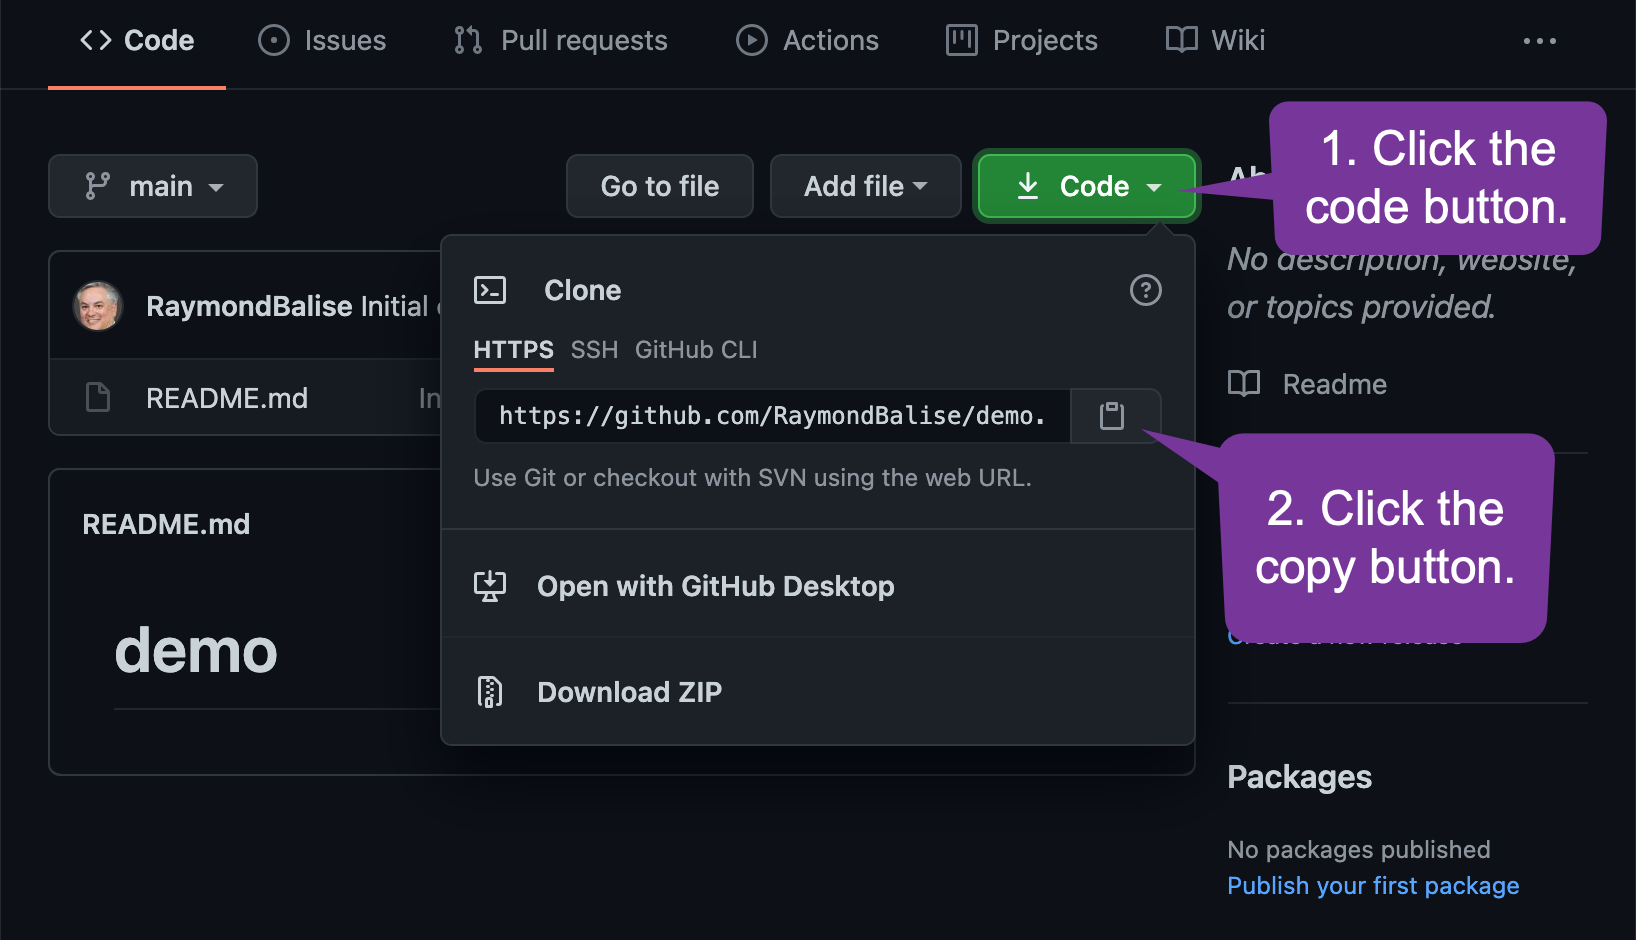 ] --- # To Create a Local Copy of the Files that are on GitHub 0. Open RStudio 1. Use the File > New Project ... 1. Choose "Version Control" 1. Choose "Git" 1. Add your project URL: .center[  ] --- # The Git Enabled Project .center[  ] --- # Notice the Files and the Git Tab .center[  ] --- # If You Have a Project Created with `rUM` `\(_{(1)}\)` You can copy the contents of the rUM folder into this GitHub enabled project folder but this requires a little care.... + Using RStudio, .red[delete] the file called .red[`.gitignore`] that was automatically created <mark>in the GitHub enabled project</mark>. .center[  ] --- # If You Have a Project Created with `rUM` `\(_{(2)}\)` Move the content of your `rUM` project folder into the GitHub enabled project folder. + Windows + Using the Windows File Explore, select all files in the rUM project, then copy and paste the files into the GitHub enabled project. Tell it to overwrite the README file. + Mac + You <mark>need to move the `.gitignore` file</mark> (which is hidden) along with everything else. + .red[Show hidden] files before you move files. To show hidden files in the Mac Finder, hold down the command key (it looks like .red[⌘]) and the .red[`shift`] key and then tap the .red[`.`] (period/decimal) key. + After you move the .gitignore file, you can do `⌘ shift .` again to hide the hidden files. --- # Dealing with Hidden Files on Mac + Files whose names starts with a .red[`.`] (period/decimal) are hidden on Mac. <br><br> .pull-left[ By default, the RStudio IDE shows some hidden files: .center[  ] ] .pull-right[ By default, the finder hides all hidden files: .center[  ] ] --- # Show Hidden Files on Mac + Show hidden files with .red[`⌘ shift .`] <br><br> .pull-left[ The finder hiding hidden files: .center[  ] ] .pull-right[ The finder showing hidden files: .center[  ] ] --- # After Moving Files to the GitHub Enabled Project .center[  ] --- # What is the big deal about .gitignore? .pull-left[ + Notice the set of files that are listed in the Git windowpane. + These are files that .red[can be tracked/backed-up/sent to GitHub]. + The .red[.gitignore] specifies files/folders to .red[not track/back-up/sent to GitHub]. ] .pull-right[ .center[ <br><br>  ] ] + My `.gitignore` file lists data files that I work with. If you work with other kinds of files that contain data, tell me and I will add them to my list. --- # .Ray's .gitignore .pull-left[ + My `.gitignore` file lists data files that I work with. + If you want to get the latest version without using `rUM`, go here: https://gist.github.com/RaymondBalise ] .pull-right[ .center[  ] ] --- # How do I move a file to GitHub? `\(_{(1)}\)` 1. You choose which files. 2. Add a message to describe the work. 3. Send it. .pull-left[ .center[  ] ] .pull-right[ .center[  ] ] --- # How do I move several related files to GitHub? `\(_{(2)}\)` 1. You choose which files. 2. Add a message to describe the work. 3. Send it. .pull-left[ .center[  ] ] .pull-right[ .center[  ] ] --- # If You Want to Intimidate People 1. You choose which files. Call this ".red[staging files]." 2. Add a message to describe the work. Call this ".red[committing files]." 3. Send it. Call this ".red[pushing files]." Call your git/GitHub project back-up/repository/web-page a .red[repo]. --- # Modified Analysis File + When you _save_ and _commit_ a file, it disappears from the `git` windowpane. + As soon as you modify a file, that you previously committed it it will be listed again in the `git` windowpane. + It will appear with a blue M to indicate the file was modified. + When you are happy with your modifications, upload it to GitHub using the same workflow. .pull-left-60[ To use the `git` terms: 1. Save 2. Stage (check off the box) 3. Commit with a message (type a summary) 4. Push (upload) ] .pull-right-37[  ] --- # Dealing with Changes .pull-left[ To use the `git` terms: 1. Save 2. Stage (check off the box) 3. Commit with a message (type a summary) 4. Push (upload) When you are on the commit screen you will see the sections that are changed. Deleted code will be in red. New code will be in green. ] .pull-right[  ] --- # The GitHub Repo After Pushing Commits .center[  ] --- # The GitHub Repo after Pushing Three Commits .center[  ] --- # Commit History .center[  ] --- # How do I get my project onto a new computer? 1) Follow the instructions to make a new GitHub project. That will give you the current state of the project. 2) Click the download button whenever you want to update the local information. .center[  ] 3) Copy the data into the project folder. --- # If You Want to Continue to Intimidate People 1. Follow the instructions to make a new GitHub project. That will give you the current state of the project. Call this .red["cloning a project]." 2. Click the download button whenever you want to update the local information. Call this ".red[pulling files]." --- # Want to learn more about R Markdown? + RStudio's website on R Markdown is excellent: https://rmarkdown.rstudio.com/ + Get the R Markdown cheat sheet: https://www.rstudio.com/wp-content/uploads/2015/02/rmarkdown-cheatsheet.pdf + _R Markdown: The Definitive Guide_ is a very readable manual and _R Markdown Cookbook_ is superb for problem solving. .center[ .pull-left[  ] .pull-right[  ] ] --- # Want to learn more about `git`/GitHub? The most popular reference for R `git`/GitHub integration is _Happy Git and GitHub_ by Jenny Bryan and Jim Hester: https://happygitwithr.com/ --- # Beyond the Basics + After you get comfortable with R Markdown, look at Emily Riederer's talk: .small[ https://www.rstudio.com/resources/rstudioconf-2020/rmarkdown-driven-development/] It is insightful and easy to follow. --- # Articles on Reproducible Research .small[ Start here: + [Reproducible Research: A Retrospective](https://www.annualreviews.org/doi/abs/10.1146/annurev-publhealth-012420-105110) by Roger Peng and Stephanie Hicks Incredibly influential: + [1,500 scientists lift the lid on reproducibility](https://www.nature.com/articles/533452a) by Monya Baker + [What does research reproducibility mean?](https://stm.sciencemag.org/content/8/341/341ps12) by Steven Goodman, Daniele Fanelli and John Ioannidis Important: + [Statistical Analyses and Reproducible Research](https://www.tandfonline.com/doi/abs/10.1198/106186007X178663) by Robert Gentleman and Duncan Temple Lang + [Repeatability of published microarray gene expression analyses](https://pubmed.ncbi.nlm.nih.gov/19174838/) by John Ioannidis et al. + [Reproducible research and Biostatistics](https://academic.oup.com/biostatistics/article/10/3/405/293660) by Roger Peng + [Reproducibility of computational workflows is automated using continuous analysis](https://www.nature.com/articles/nbt.3780) by Brett Beaulieu-Jones and Casey Greene ] --- # Coming in 2021 + I will "live code" a couple research projects using R and R Markdown and GitHub for CHARM in September 2021. .center[  ]